This post is the winner of The CodeProject Android Development Competition
Introduction
I have been designing and developing mobile applications for less than 1 year, though I’m a professional software developer for 10 years or so, and this new mobile era makes me feel excited. As of today there are two and a half major platforms gaining pretty well reputation by the mobile users. Two of them are iOS (formerly known as iPhone OS) and Android and the half is long debated Windows Phone 7.
In this tutorial article I will try to introduce you to the general development principles of Android by building a real calculator application (TouchCalculator). By the end of this tutorial you will be able to build Android applications with simple user interfaces and backing business logic.
Preparing Yourself and The Development Environment
Before you get started, if you are totally new to Android I would suggest you to read the What is Android? section from the Android Developers site and I would also suggest you to have a look at Android Developers Blog.
If you have not configured an Android development environment already, please follow the instructions in this link.
TouchCalculator MockUp
TouchCalculator, our sample and simple calculator, is a standard calculator supporting four arithmetic operations and three mathematical functions (namely square root, reciprocle and percentage) along with a memory buffer.
Let’s start with the mockup of our calculator. Below is a color coded sketch of our application. I’ve seperated the UI into locigal parts and each part is represented with a color highlight. There is a reasoning behind the conceptual seperation and this will be evident in the next sections of the tutorial.
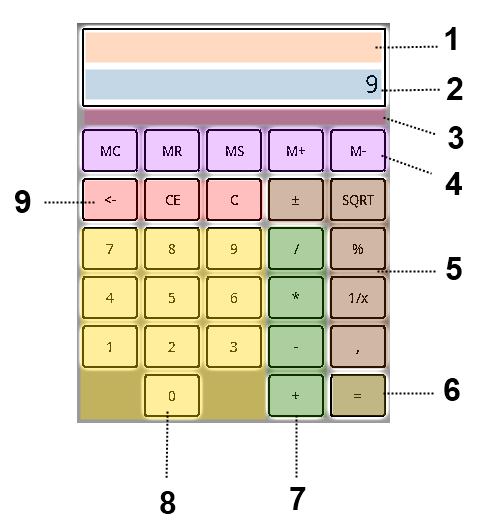
So, let us see what is intended with each region in our mockup.
- We will display the subsequent user input until user presses (=) to calculate the result or C to clear the input buffer
- Immediate user input and the result of the buffer will be displayed
- Memory buffer value will be displayed in this area
- Memory buffer operation buttons
- Other operation buttons
- Calculate button
- Arithmetic operation buttons
- Numeric keypad buttons
- Immediate input and buffer clear buttons
TouchCalculator Use Cases
Our calculator shall be able to support the following use cases
- Calculator shall be initialized with input value of 0 and as soon as the user starts pressing numeric keypad buttons, input capture shall start
- User will press the numeric keypad buttons and we will append each numeric value to the current value of Area #2
- If user presses the decimal seperator button placed in Area #5 we shall append the seperator to the current value of Area #2
- When user presses an arithmetic operator button placed in Area #7 we shall display the input buffer content in Area #1. If input buffer has enough input to produce a result we shall also calculate the result and display the value in Area #2
- When user presses (=) button and if input buffer has enough input to produce a result we shall calculate the result and display it in Area #2, else do nothing.
- When user presses the backspace button (<-) we shall trim the last digit of the value displayed in Area #2
- When the user presses the CE button we shall reset the value displayed in Area #2 so that it becomes 0
- When user presses the C button we shall reset the input buffer and the value displayed in Area #2 so that it becomes 0
- When user presses (±) we shall toggle the sign of the user input value displayed in Area #2
- When user presses MC button we shall clear the memory buffer
- When user presses MR button we shall read the value in memory buffer and display that value in Area #2
- When user presses MS button we shall set the value of the memory buffer to the value displayed in Area #2
- When user presses M+ or M- buttons we shall add/subtract the value displayed in Area #2 with the exisiting value of the memory buffer
- When user presses SQRT button we shall calculate the square root of the value displayed in Area #2 and display the result in Area #2
- When user presses 1/x button we shall calculate the reciprocle of the value displayed in Area #2 and display the result in Area #
- When user presses % button we shall calculate the result of the input buffer and find the percent of the result and display in Area #2
Creating The Bare Bones User Interface
Since we have our calculator mockup, we can start creating the bare bones Android user interface of our calculator. When you create a new Android project in Eclipse, you will have a default layout xml file named main.xml under res/layout folder. We will create the bare bones calculator user interface declaratively, not from code, inside this xml file. Using declarative xml files, layout files, while constructing the user interface has advantages. The primary advantage of using XML is that you seperate the presentation of your application from the code used to control your applications behaviour. In a team environment this seperation enables designers and coders to work on the same application simultaneously. Designers familiar with HTML can easly design Android user interfaces once they get familiar with Android layout vocabulary.You can read more about Android layouts from here.
Now, lets see how we can accomplish an Android UI to represent different UI parts sketched in our TouchCalculator Mockup. Building blocks of Android UI are Views and ViewGroups. Views are basic user interface bits which provide screen layout and user interaction. For example Button, TextView and CheckBox are simple views extending the abstract View class. ViewGroups are composite user interface bits which can contain multiple Views and other ViewGroups. LinearLayout and GridView are two of the view groups we will use to construct our calculator.
In our mockup, we have actually four sections layed out in linear direction vertically. First three sections are for the areas labeled with 1,2 and 3 and the fourth section is for the keypad, containing sections labeled with 4,5,6,7,8 and 9. Thus, we will use LinearLayout ViewGroup so that we can place Views for each section. Here is our bare bones layout XML
<?xml version="1.0" encoding="utf-8"?>
<LinearLayout xmlns:android="http://schemas.android.com/apk/res/android"
    android:orientation="vertical"
    android:layout_width="fill_parent"
    android:layout_height="fill_parent">

	<TextView
	    android:id="@+id/txtStack"
	    android:layout_width="fill_parent"
	    android:layout_height="wrap_content"
	   	android:textSize="15sp"
	    android:gravity="right"
	    android:layout_marginTop = "3sp"
	    android:layout_marginLeft = "5sp"
	    android:layout_marginRight = "5sp"/>

    <TextView
    	android:id="@+id/txtInput"
    	android:layout_width="fill_parent"
    	android:layout_height="wrap_content"
    	android:textSize="25sp"
    	android:gravity="right"
    	android:layout_marginLeft = "5sp"
   		android:layout_marginRight = "5sp"/>

    <TextView
    	android:id="@+id/txtMemory"
    	android:layout_width="fill_parent"
    	android:layout_height="wrap_content"
    	android:textSize="15sp"
    	android:gravity="left"
        android:layout_marginLeft = "5sp"
   		android:layout_marginRight = "5sp"/>

<GridView xmlns:android="http://schemas.android.com/apk/res/android"
    android:id="@+id/grdButtons"
    android:layout_width="fill_parent"
    android:layout_height="fill_parent"
    android:columnWidth="90dp"
    android:numColumns="5"
    android:verticalSpacing="10dp"
    android:horizontalSpacing="10dp"
    android:stretchMode="columnWidth"
    android:gravity="center"/>
</LinearLayout>
We will use TextView to represent areas labeled with 1,2 and 3 in our mockup. We will use GridView ViewGroup for the keypad. We will place our keypad buttons inside the cells of the GridView at runtime by using an Adapter
Most of the View and ViewGroup attributes are self explanatory. You can infer easily what an attribute is used for, actually Eclipse xml editor will also help you if you press Ctrl+Space you will be presented a list of attributes. I will mention id attribute explicitly since it has special importance. Any view or view group can have an id attribute, but this is not a must. If you want to get reference to the View or ViewGroup from your code, you should set the id attribute of your Views and ViewGroups. id attribute has some sort of special notation which you can read more about here.
If you press on the Layout tab in Eclipse XML editor where our layout is defined, you will see the bare bones UI as shown in the image below. Note that by using the LinearLayout we have managed to put each logial section in linear direction vertically.

Loading And Displaying The Layout
The XML layout we have defined is not enough by itself, since the users can not get into interaction with our application through the layout directly. As the terminology implies layout XML is used just for defining the placement and visual aspects of the UI bits. What we need in order to enable user interaction is the Activity class, which controls the behaviour of our UI and enables user interaction.
When you create a new Android project with Eclipse, you will be asked for the details of your project and one of them is the optional Create Activity check box along with a name for your first Android activity class. For all practical purposes we have named our activity to be main. Eclipse will automatically create a “main.java” file under the src/package node. Here is the initial contents of our main activity class
package com.pragmatouch.calculator;

import android.app.Activity;
import android.os.Bundle;

public class main extends Activity {

	/** Called when the activity is first created. */
	@Override
	public void onCreate(Bundle savedInstanceState) {
		super.onCreate(savedInstanceState);
		setContentView(R.layout.main);

	}
}
As you can see, we override the onCreate (Line 10) method of the base Activity and perform activity initialization, loading layout is part of our initialization process, inside the overriden method.
setContentView method called on Line 12 belongs to base Activity class and is used to load the UI layout from a resource (main.xml) identified by an integer. Please note how we get the integer identifier of our main.xml. When Android builds your application, it automatically generates a class named R (can be found under /TouchCalculator/gen/com/pragmatouch/calculator/R.java) and generates identifier constants for your resources, since main.xml is a resource Android generates a constant for us and we can use that constant from our code to load our layout.
If you run the application you will see an empty UI with two linear TextViews placed on top with no keypad.
Modeling The Keypad Buttons
In this section, we will model our keypad buttons using Java enum type. Java enums are interesting for a guy like me. Spending too many years with C# I must confess that Java enums are much more capable than the C# enums since the Java enum class body can include methods and other fields.
To model the keypad buttons we will declare a KeypadButton enum class, which will also hold button text and category information.
package com.pragmatouch.calculator;

public enum KeypadButton {
  MC("MC",KeypadButtonCategory.MEMORYBUFFER)
, MR("MR",KeypadButtonCategory.MEMORYBUFFER)
, MS("MS",KeypadButtonCategory.MEMORYBUFFER)
, M_ADD("M+",KeypadButtonCategory.MEMORYBUFFER)
, M_REMOVE("M-",KeypadButtonCategory.MEMORYBUFFER)
, BACKSPACE("<-",KeypadButtonCategory.CLEAR)
, CE("CE",KeypadButtonCategory.CLEAR)
, C("C",KeypadButtonCategory.CLEAR)
, ZERO("0",KeypadButtonCategory.NUMBER)
, ONE("1",KeypadButtonCategory.NUMBER)
, TWO("2",KeypadButtonCategory.NUMBER)
, THREE("3",KeypadButtonCategory.NUMBER)
, FOUR("4",KeypadButtonCategory.NUMBER)
, FIVE("5",KeypadButtonCategory.NUMBER)
, SIX("6",KeypadButtonCategory.NUMBER)
, SEVEN("7",KeypadButtonCategory.NUMBER)
, EIGHT("8",KeypadButtonCategory.NUMBER)
, NINE("9",KeypadButtonCategory.NUMBER)
, PLUS(" + ",KeypadButtonCategory.OPERATOR)
, MINUS(" - ",KeypadButtonCategory.OPERATOR)
, MULTIPLY(" * ",KeypadButtonCategory.OPERATOR)
, DIV(" / ",KeypadButtonCategory.OPERATOR)
, RECIPROC("1/x",KeypadButtonCategory.OTHER)
, DECIMAL_SEP(",",KeypadButtonCategory.OTHER)
, SIGN("±",KeypadButtonCategory.OTHER)
, SQRT("SQRT",KeypadButtonCategory.OTHER)
, PERCENT("%",KeypadButtonCategory.OTHER)
, CALCULATE("=",KeypadButtonCategory.RESULT)
, DUMMY("",KeypadButtonCategory.DUMMY);

 CharSequence mText; // Display Text
 KeypadButtonCategory mCategory;

  KeypadButton(CharSequence text,KeypadButtonCategory category) {
    mText = text;
    mCategory = category;
  }

  public CharSequence getText() {
    return mText;
  }
}
Each keypad button shown in our mockup is represented with an enum constant and each constant also holds a text and a category value. We also use Java enums to represent the keypad button categories and declare a KeypadButtonCategory enum class.
package com.pragmatouch.calculator;

public enum KeypadButtonCategory {
  MEMORYBUFFER
  , NUMBER
  , OPERATOR
  , DUMMY
  , CLEAR
  , RESULT
  , OTHER
}
We will utilize KeypadButtonCategory enums for applying different styles for each category so that our sample calculator seems more colorfull.
Creating The Keypad Buttons
As I mentioned in the previous sections, we will use GridView to display our keypad. We will use a five column GridView and we will declare anAdapter
which extends the BaseAdapter class and is responsible of providing data to our AdapterView that is a GridView in our case.
package com.pragmatouch.calculator;

import android.widget.*;
import android.content.*;
import android.view.*;
import android.view.View.OnClickListener;

public class KeypadAdapter extends BaseAdapter {
  private Context mContext;

  public KeypadAdapter(Context c) {
    mContext = c;
  }

  public int getCount() {
    return mButtons.length;
  }

  public Object getItem(int position) {
    return mButtons[position];
  }

  public long getItemId(int position) {
    return 0;
  }

// create a new ButtonView for each item referenced by the Adapter
public View getView(int position, View convertView, ViewGroup parent) {
  Button btn;
  if (convertView == null) { // if it's not recycled, initialize some attributes
    btn = new Button(mContext);
    KeypadButton keypadButton = mButtons[position];

    // Set CalculatorButton enumeration as tag of the button so that we
    // will use this information from our main view to identify what to do
    btn.setTag(keypadButton);
  }
  else {
    btn = (Button) convertView;
  }

  btn.setText(mButtons[position].getText());
  return btn;
}

// Create and populate keypad buttons array with CalculatorButton values
private KeypadButton[] mButtons = { KeypadButton.MC, KeypadButton.MR,KeypadButton.MS, KeypadButton.M_ADD, KeypadButton.M_REMOVE,
 KeypadButton.BACKSPACE, KeypadButton.CE, KeypadButton.C,KeypadButton.SIGN, KeypadButton.SQRT,
 KeypadButton.SEVEN,KeypadButton.EIGHT, KeypadButton.NINE, KeypadButton.DIV,KeypadButton.PERCENT,
 KeypadButton.FOUR, KeypadButton.FIVE,KeypadButton.SIX, KeypadButton.MULTIPLY, KeypadButton.RECIPROC,
 KeypadButton.ONE, KeypadButton.TWO, KeypadButton.THREE,KeypadButton.MINUS, KeypadButton.DECIMAL_SEP,
 KeypadButton.DUMMY, KeypadButton.ZERO,KeypadButton.DUMMY,KeypadButton.PLUS, KeypadButton.CALCULATE };
}
Adapters are responsible for providing data to AdapterViews, in our case the data we will provide to our GridView is keypad button instances. To be able to create these button instances, we define an array of KeypadButton enums on Line 47-52.
Our KeypadAdapter provides keypad button instances to our GridView with the getView (Line 28-44) method implementation where we instantiate or revoke our keypad buttons and set their properties based on their position on the GridView.
Please note what Line 36 does in the code. We set KeypadButton enum instance as the tag of our Button and we will use that tag value during business logic implementation to identify what to do when the user presses a keypad button.
Displaying The Keypad
Now, we have defined our Adapter and it is time to wire-up the GridView with our KeypadAdapter. Here is our main.java file.
package com.pragmatouch.calculator;

import android.app.Activity;
import android.os.Bundle;
import android.widget.AdapterView;
import android.widget.GridView;
import android.view.View;
import android.view.View.OnClickListener;

public class main extends Activity {
 GridView mKeypadGrid;
 KeypadAdapter mKeypadAdapter;

/** Called when the activity is first created. */
@Override
public void onCreate(Bundle savedInstanceState) {
 super.onCreate(savedInstanceState);
 setContentView(R.layout.main);

 // Get reference to the keypad button GridView
 mKeypadGrid = (GridView) findViewById(R.id.grdButtons);

 // Create Keypad Adapter
 mKeypadAdapter = new KeypadAdapter(this);

 // Set adapter of the keypad grid
 mKeypadGrid.setAdapter(mKeypadAdapter);

 });

 mKeypadGrid.setOnItemClickListener(new OnItemClickListener() {
     public void onItemClick(AdapterView<?> parent, View v,int position, long id) {
       // This will not help us catch button clicks!
     }
 });

 }

}
Note that we create an instance of our KeypadAdapter on Line 25 and set this instance as the adapter of our GridView on Line 28. Another thing I want you to notice in the code above is the findViewById call on Line 21. As I noted in previous section, we use the value of the id attribute we have assigned to our GridView in our layout XML (main.xml).
When you run the TouchCalculator at this point, you will see the following UI which is almost the same as our mockup.

Implementing The Business Logic
Now it is time to implement the business logic of our calculator. We will utilize Java Stack class in order to implement our calulation logic. We will have two Stack instances; the first instance will hold the user input and the second stack will hold the intermediate calculation results. We will wrap our business logic as an instance method inside our main class. Here is our ProcessKeypadInput method along with some utility methods.
private void ProcessKeypadInput(KeypadButton keypadButton) {
		// Toast.makeText(this, keypadButton.getText(),
		// Toast.LENGTH_SHORT).show();
		String text = keypadButton.getText().toString();
		String currentInput = userInputText.getText().toString();

		int currentInputLen = currentInput.length();
		String evalResult = null;
		double userInputValue = Double.NaN;

		switch (keypadButton) {
		case BACKSPACE: // Handle backspace
			// If has operand skip backspace
			if (resetInput)
				return;

			int endIndex = currentInputLen - 1;

			// There is one character at input so reset input to 0
			if (endIndex < 1) {
				userInputText.setText("0");
			}
			// Trim last character of the input text
			else {
				userInputText.setText(currentInput.subSequence(0, endIndex));
			}
			break;
		case SIGN: // Handle -/+ sign
			// input has text and is different than initial value 0
			if (currentInputLen > 0 && currentInput != "0") {
				// Already has (-) sign. Remove that sign
				if (currentInput.charAt(0) == '-') {
					userInputText.setText(currentInput.subSequence(1,
							currentInputLen));
				}
				// Prepend (-) sign
				else {
					userInputText.setText("-" + currentInput.toString());
				}
			}
			break;
		case CE: // Handle clear input
			userInputText.setText("0");
			break;
		case C: // Handle clear input and stack
			userInputText.setText("0");
			clearStacks();
			break;
		case DECIMAL_SEP: // Handle decimal seperator
			if (hasFinalResult || resetInput) {
				userInputText.setText("0" + mDecimalSeperator);
				hasFinalResult = false;
				resetInput = false;
			} else if (currentInput.contains("."))
				return;
			else
				userInputText.append(mDecimalSeperator);
			break;
		case DIV:
		case PLUS:
		case MINUS:
		case MULTIPLY:
			if (resetInput) {
				mInputStack.pop();
				mOperationStack.pop();
			} else {
				if (currentInput.charAt(0) == '-') {
					mInputStack.add("(" + currentInput + ")");
				} else {
					mInputStack.add(currentInput);
				}
				mOperationStack.add(currentInput);
			}

			mInputStack.add(text);
			mOperationStack.add(text);

			dumpInputStack();
			evalResult = evaluateResult(false);
			if (evalResult != null)
				userInputText.setText(evalResult);

			resetInput = true;
			break;
		case CALCULATE:
			if (mOperationStack.size() == 0)
				break;

			mOperationStack.add(currentInput);
			evalResult = evaluateResult(true);
			if (evalResult != null) {
				clearStacks();
				userInputText.setText(evalResult);
				resetInput = false;
				hasFinalResult = true;
			}
			break;
		case M_ADD: // Add user input value to memory buffer
			userInputValue = tryParseUserInput();
			if (Double.isNaN(userInputValue))
				return;
			if (Double.isNaN(memoryValue))
				memoryValue = 0;
			memoryValue += userInputValue;
			displayMemoryStat();

			hasFinalResult = true;

			break;
		case M_REMOVE: // Subtract user input value to memory buffer
			userInputValue = tryParseUserInput();
			if (Double.isNaN(userInputValue))
				return;
			if (Double.isNaN(memoryValue))
				memoryValue = 0;
			memoryValue -= userInputValue;
			displayMemoryStat();
			hasFinalResult = true;
			break;
		case MC: // Reset memory buffer to 0
			memoryValue = Double.NaN;
			displayMemoryStat();
			break;
		case MR: // Read memoryBuffer value
			if (Double.isNaN(memoryValue))
				return;
			userInputText.setText(doubleToString(memoryValue));
			displayMemoryStat();
			break;
		case MS: // Set memoryBuffer value to user input
			userInputValue = tryParseUserInput();
			if (Double.isNaN(userInputValue))
				return;
			memoryValue = userInputValue;
			displayMemoryStat();
			hasFinalResult = true;
			break;
		default:
			if (Character.isDigit(text.charAt(0))) {
				if (currentInput.equals("0") || resetInput || hasFinalResult) {
					userInputText.setText(text);
					resetInput = false;
					hasFinalResult = false;
				} else {
					userInputText.append(text);
					resetInput = false;
				}

			}
			break;

		}

	}

	private void clearStacks() {
		mInputStack.clear();
		mOperationStack.clear();
		mStackText.setText("");
	}

	private void dumpInputStack() {
		Iterator<String> it = mInputStack.iterator();
		StringBuilder sb = new StringBuilder();

		while (it.hasNext()) {
			CharSequence iValue = it.next();
			sb.append(iValue);

		}

		mStackText.setText(sb.toString());
	}

	private String evaluateResult(boolean requestedByUser) {
		if ((!requestedByUser && mOperationStack.size() != 4)
				|| (requestedByUser && mOperationStack.size() != 3))
			return null;

		String left = mOperationStack.get(0);
		String operator = mOperationStack.get(1);
		String right = mOperationStack.get(2);
		String tmp = null;
		if (!requestedByUser)
			tmp = mOperationStack.get(3);

		double leftVal = Double.parseDouble(left.toString());
		double rightVal = Double.parseDouble(right.toString());
		double result = Double.NaN;

		if (operator.equals(KeypadButton.DIV.getText())) {
			result = leftVal / rightVal;
		} else if (operator.equals(KeypadButton.MULTIPLY.getText())) {
			result = leftVal * rightVal;

		} else if (operator.equals(KeypadButton.PLUS.getText())) {
			result = leftVal + rightVal;
		} else if (operator.equals(KeypadButton.MINUS.getText())) {
			result = leftVal - rightVal;

		}

		String resultStr = doubleToString(result);
		if (resultStr == null)
			return null;

		mOperationStack.clear();
		if (!requestedByUser) {
			mOperationStack.add(resultStr);
			mOperationStack.add(tmp);
		}

		return resultStr;
	}

	private String doubleToString(double value) {
		if (Double.isNaN(value))
			return null;

		long longVal = (long) value;
		if (longVal == value)
			return Long.toString(longVal);
		else
			return Double.toString(value);

	}

	private double tryParseUserInput() {
		String inputStr = userInputText.getText().toString();
		double result = Double.NaN;
		try {
			result = Double.parseDouble(inputStr);

		} catch (NumberFormatException nfe) {}
		return result;

	}

	private void displayMemoryStat() {
		if (Double.isNaN(memoryValue)) {
			memoryStatText.setText("");
		} else {
			memoryStatText.setText("M = " + doubleToString(memoryValue));
		}
	}
ProcessKeypadInput method is called each time user presses a keypad button and we decide what to do with a swtich/case code block. We also have some helper methods
- clearStacks, is used to clear our stacks and the user input TextView
- dumpInputStack, is used to dump the input stack as a single line string to the TextView represented as Area #1 in our mockup
- evaluateResult, is called when user presses an artihmetic operation keypad button or the (=) keypad button. Inside this method we try to calculate a result by popping values from our operation stack and we push the result as the first item to the operation stack if we were able to calculate a result
- doubleToString, utility method which is used to convert a double value to String
- tryParseUserInput, utility method where we try to parse the user input, represented as Area #2 in our mockup, as a valid double value
- displayMemoryStat, utility method used to dump the memory buffer status and value to the Area #3 in our mockup
The Right Place To Call ProcessKeypadInput Method
In “Displaying The Keypad” section please take a look at the comment placed on Line 34. If you read the GridView Sample in Android Developers site, you might think that this line is the right place to put the ProcessKeypadInput method call since the user will click on the keypad buttons which are in turn items of our GridView that in turn will trigger the OnItemClick event. This assumption is absolutely wrong in our case. If you put the call to ProcessKeypadInput method on that line and run your application OnItemClick of our GridView will not be fired even though a button is pressed. The reason for this misconception is this : Since Button views placed in the cells of the GridView are clickable, when user clicks over a button the Button view handles that click and the action is not propagated to the GridView.
Solution to this problem is pretty straight forward; we have to set OnClickListener of our keypad Button views and we will do that in our KeypadAdapter class. Below is the modified version of our KeypadAdapter class.
package com.pragmatouch.calculator;

import android.widget.*;
import android.content.*;
import android.view.*;
import android.view.View.OnClickListener;

public class KeypadAdapter extends BaseAdapter {
	private Context mContext;

	// Declare button click listener variable
	private OnClickListener mOnButtonClick;

	public KeypadAdapter(Context c) {
		mContext = c;
	}

	// Method to set button click listener variable
	public void setOnButtonClickListener(OnClickListener listener) {
		mOnButtonClick = listener;
	}

	public int getCount() {
		return mButtons.length;
	}

	public Object getItem(int position) {
		return mButtons[position];
	}

	public long getItemId(int position) {
		return 0;
	}

	// create a new ButtonView for each item referenced by the Adapter
	public View getView(int position, View convertView, ViewGroup parent) {
		Button btn;
		if (convertView == null) { // if it's not recycled, initialize some
									// attributes

			btn = new Button(mContext);
			KeypadButton keypadButton = mButtons[position];
			if (keypadButton != KeypadButton.DUMMY)
               btn.setOnClickListener(mOnButtonClick);

			// Set CalculatorButton enumeration as tag of the button so that we
			// will use this information from our main view to identify what to
			// do
			btn.setTag(keypadButton);
		} else {
			btn = (Button) convertView;
		}

		btn.setText(mButtons[position].getText());
		return btn;
	}

	// Create and populate keypad buttons array with CalculatorButton enum
	// values
	private KeypadButton[] mButtons = { KeypadButton.MC, KeypadButton.MR,
	  KeypadButton.MS, KeypadButton.M_ADD, KeypadButton.M_REMOVE,
	  KeypadButton.BACKSPACE, KeypadButton.CE, KeypadButton.C,
	  KeypadButton.SIGN, KeypadButton.SQRT, KeypadButton.SEVEN,
	  KeypadButton.EIGHT, KeypadButton.NINE, KeypadButton.DIV,
	  KeypadButton.PERCENT, KeypadButton.FOUR, KeypadButton.FIVE,
	  KeypadButton.SIX, KeypadButton.MULTIPLY, KeypadButton.RECIPROC,
	  KeypadButton.ONE, KeypadButton.TWO, KeypadButton.THREE,
	  KeypadButton.MINUS, KeypadButton.DECIMAL_SEP, KeypadButton.DUMMY,
	  KeypadButton.ZERO, KeypadButton.DUMMY, KeypadButton.PLUS,
	KeypadButton.CALCULATE };

}
We declared mOnButtonClick field on Line 12 and defined a setter method for this field on Line 19-21. Then we set OnClickListener of our Button views to mOnButtonClick value on Line 43-44.
In order to catch button clicks and call ProcessKeypadInput, we also have to modify our main class.
package com.pragmatouch.calculator;

import android.app.Activity;
import android.os.Bundle;
import android.widget.AdapterView;
import android.widget.GridView;
import android.view.View;
import android.view.View.OnClickListener;

public class main extends Activity {
 GridView mKeypadGrid;
 KeypadAdapter mKeypadAdapter;

/** Called when the activity is first created. */
@Override
public void onCreate(Bundle savedInstanceState) {
 super.onCreate(savedInstanceState);
 setContentView(R.layout.main);

 // Get reference to the keypad button GridView
 mKeypadGrid = (GridView) findViewById(R.id.grdButtons);

 // Create Keypad Adapter
 mKeypadAdapter = new KeypadAdapter(this);

 // Set adapter of the keypad grid
 mKeypadGrid.setAdapter(mKeypadAdapter);

 // Set button click listener of the keypad adapter
 mKeypadAdapter.setOnButtonClickListener(new OnClickListener() {
 @Override
 public void onClick(View v) {
   Button btn = (Button) v;
   // Get the KeypadButton value which is used to identify the
   // keypad button from the Button's tag
   KeypadButton keypadButton = (KeypadButton) btn.getTag();

   // Process keypad button
   ProcessKeypadInput(keypadButton);
  }});
 });

 mKeypadGrid.setOnItemClickListener(new OnItemClickListener() {
     public void onItemClick(AdapterView<?> parent, View v,int position, long id) {
       // This will not help us catch button clicks!
     }
 });

 }

}
We set OnButtonClickListener of our KeypadAdapter class on Line 31-42.
Are we done yet?
We have a fully functional (actually I left implementaton of SQRT, 1/x and % to you as an excercise) standard calculator but there is always room for improvement and visual styling. In this last section I will try to show you a simple sample for styling our keypad buttons and the TextViews we have used in our UI. For more information about Using Styles And Themes please visit this link.
Applying Style To Our Keypad
Android has lots of different resource types and it is possible to style your Android application’s UI at different levels by utilizing these resources. As a simple example, we will use Drawable resource type (to be more specific State List drawable resource type) for styling. You can check out this link for more resource types though.
First of all we have to define a State List drawable as an XML file under res/drawable. If you installed the latest Android SDK you will see* *drawable-hdpi, **drawable-ldpi under res folder but there is no drawable folder. You can safely create a drawable folder if you do not already have one. After ensuring thatdrawable folder exists, add an XML file with name keypadclear1.xml. Inside keypadclear1.xml you will have the following markup code which defines a style for Button views.
<?xml version="1.0" encoding="utf-8"?>
<selector
    xmlns:android="http://schemas.android.com/apk/res/android">
    <item android:state_pressed="true" >
        <shape>
            <gradient
                android:startColor="#ff8c00"
                android:endColor="#FFFFFF"
                android:angle="270" />
            <stroke
                android:width="2dp"
                android:color="#dcdcdc" />
            <corners
                android:radius="2dp" />
            <padding
                android:left="10dp"
                android:top="10dp"
                android:right="10dp"
                android:bottom="10dp" />
        </shape>
    </item>

    <item android:state_focused="true" >
        <shape>
            <gradient
                android:startColor="#ffc2b7"
                android:endColor="#ffc2b7"
                android:angle="270" />
            <stroke
                android:width="2dp"
                android:color="#dcdcdc" />
            <corners
                android:radius="2dp" />
            <padding
                android:left="10dp"
                android:top="10dp"
                android:right="10dp"
                android:bottom="10dp" />
        </shape>
    </item>

    <item>
        <shape>
            <gradient
                android:startColor="#ff9d77"
                android:endColor="#ff9d77"
                android:angle="270" />
            <stroke
                android:width="2dp"
                android:color="#fad3cf" />
            <corners
                android:radius="2dp" />
            <padding
                android:left="10dp"
                android:top="10dp"
                android:right="10dp"
                android:bottom="10dp" />
        </shape>
    </item>
</selector>
keypadclear1.xml contains seperate style definitions for each of the three possible states of a Button view. Now that we have our State List drawable resource ready, we have to write some code to make use of this resource. We will set the background of keypad buttons of KeypadButtonCategory.CLEAR to be styled according to the definitions of keypadclear1.xml. We will modify getView method of our KeypadAdapter class slightly
	// create a new ButtonView for each item referenced by the Adapter
	public View getView(int position, View convertView, ViewGroup parent) {
		Button btn;
		if (convertView == null) { // if it's not recycled, initialize some attributes

			btn = new Button(mContext);
			KeypadButton keypadButton = mButtons[position];

			if (keypadButton != KeypadButton.DUMMY)
               btn.setOnClickListener(mOnButtonClick);

			if(keypadButton != KeypadButton.CLEAR)
			   btn.setBackgroundResource(R.drawable.keypadclear1);

			// Set CalculatorButton enumeration as tag of the button so that we
			// will use this information from our main view to identify what to do
			btn.setTag(keypadButton);
		} else {
			btn = (Button) convertView;
		}

		btn.setText(mButtons[position].getText());
		return btn;
	}
On Line 13, we set the background resource of our Button views if they are categorized as KeypadButtonCategory.CLEAR and that is all, we have pinky rounded buttons sketched as Area #9 in our mockup.
Accomplishment
We got familiar with Android application development and evaluate different aspects of an Android application’s UI. We developed a styled calculator which looks like the image atatched below

Is There Room For Improvement In TouchCalculator?
Yes. There is always room for improvement and I intentionally left some business logic implementation to you. Here is the list of possible improvements
- Implement SQRT
- Implement 1/x (reciproc)
- Implement % (percent)
- Handle division by zero cases properly
- Implement different styles and provide “Switch Theme”dialog to the user
In order to to fix Eclipse SDK 3.6 null pointer exception appearing when you try to edit res/values/strings.xml resource open res\values\strings.xml with Text Editor and replace
<resources> with
<resources xmlns:android=”http://schemas.android.com/apk/res/android”>