In this blog post I will give you some details about the Git Workflow we are using at İstanbul Bilgi University.

Our flow includes some inspiration and material from James Kurczodyna’s ENV Branching with Git post.
SIS Web Environments
Test Environment
This environment is used by the product owners for tesing purposes and validate the implementation of a feature or hotfix. For our web apps this is a web farm environment.
- Applications deployed to this environment use our test databases running on the test servers
- Apps are built and deployed to the test environment by Jenkins when we push code to the staging branches
Classic ASP site is deployed manually (diff then merge).
Production Environment
This environment is the production environment. For our web apps this is a web farm environment
- Apps deployed on this environment use our production databases.
- Apps are built and deployed to production environment by Jenkins when we push code to the master branches
Classic ASP site is deployed manually (diff then merge).
Local Development Environments
All development and debugging happens on the developers’ own local environment.
- We use local IIS
- All database development happens on central development databases
- Before merging branches to staging we update feature/hotfix database scripts on central test databases
- Test databases are periodically restored from the production databases.
Exceptions
- Desktop applications do not follow the environment branchging workflow. Modifications to these apps are pushed to the master branch by the developer
- Moodle customizations do not follow the environment branching workflow, we have branch per Moodle version and the developer pushes directly to the master branch
Branches
Environment Branches
These are the branches which live forever on our remote origin.
- master (is protected) (Production Environment)
- staging (Test Environment)
- develop (Local Development Environment)
Supporting branches
These branches are eventually deleted but may live for a short or a very long period. Before a code review session or when the time comes for integration with environment branches we push these branches to the remote origin.
- Feature ( feature/JiraKey )
- Hotfix ( hotfix/JiraKey )
Shared Branches
If we have a very big feature which will be developed by more than one person we push that branch to the remote origin immediately after branching and before any development begins. All the developers working on that big feature rebase from and push to this shared supporting branch.
The Workflow
The Rules
To maintain the integrity of the branches and ensure we can deploy features independently we follow these rules (from James Kurczodyna’s post):
- NEVER commit directly to an ENVIRONMENT branch (master, staging or develop)
- NEVER merge one ENVIRONMENT branch into another
- Feature and hotfix branches should be autonomously deployable
Branching
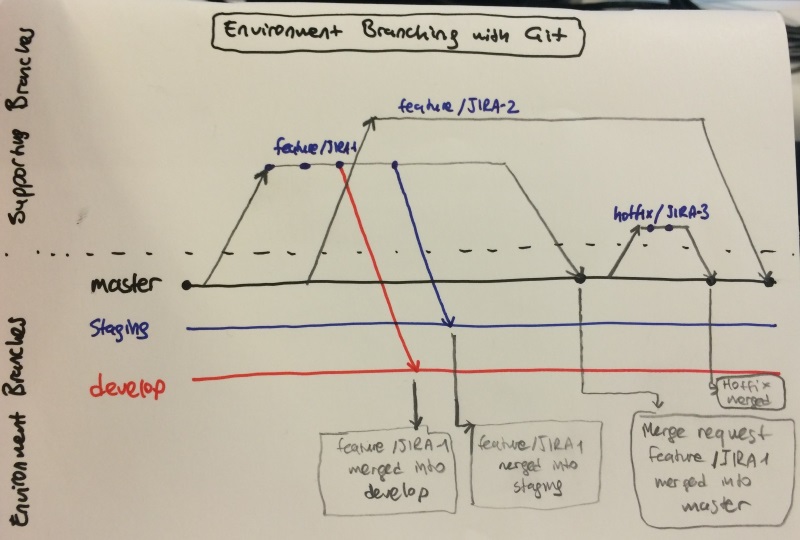
All support branches branch off master.
Please note, the drawing at the top of the post shows a hotfix branch which is branched off master and integrated into master. This is not a practice we follow with hotfix branchs. A hotfix branch is processed just like a feature branch.
Naming convention we use for support branches is
- feature/JiraKey
- hotfix/JiraKey
We use Jira issue keys as branch names. This might be an issue in TALEP project (this is the project we use for service desk purposes) or any other internal project.
We prefer the key from the TALEP project but if the feature does not come with a TALEP issue we still create a an issue in a different Jira project (we have module or app specific internal Jira projects) and use that key for the branch name.
Jira Subtasks
If a feature or hotfix has sub tasks we use sub task jira keys in our branch commits.
Multi-issue changes
If a feature has more than one Jira issue ( note not subtasks but linked issues) this is not good and indicates a problem in our planning process. In this case the developer notifies the team manager and asks for consolidation. Then the team manager consolidates all issues, most of the time under a parent Jira issue.
Merging
Support branches are merged into develop and staging environment branches by the supporting branch owners. Merges into the production environment (master) happen through GitLab’s merge requests.
[feature] to [develop]
When the development of a feature/hotfix is completed the branch is merged into the develop branch by the branch owner. If the support branch is a shared branch one developer from the team performs the merge.
After integrating the changes from support branch into the develop, the branch owner builds the app and runs the tests locally.
[feature] to [staging]
If everything is ok on the develop branch and ready for user acceptance testing (UAT) the branch owner merges the branch to staging environment branch.
[feature] to [production]
Upon receiving user acceptance a Jira Deployment issue is created and the the branch is pushed to the remote origin by the branch owner. The branch owner then creates a GitLab merge request (chooses feature branch as the source and master as the destination) and assigns the request to the Deployment Engineer.
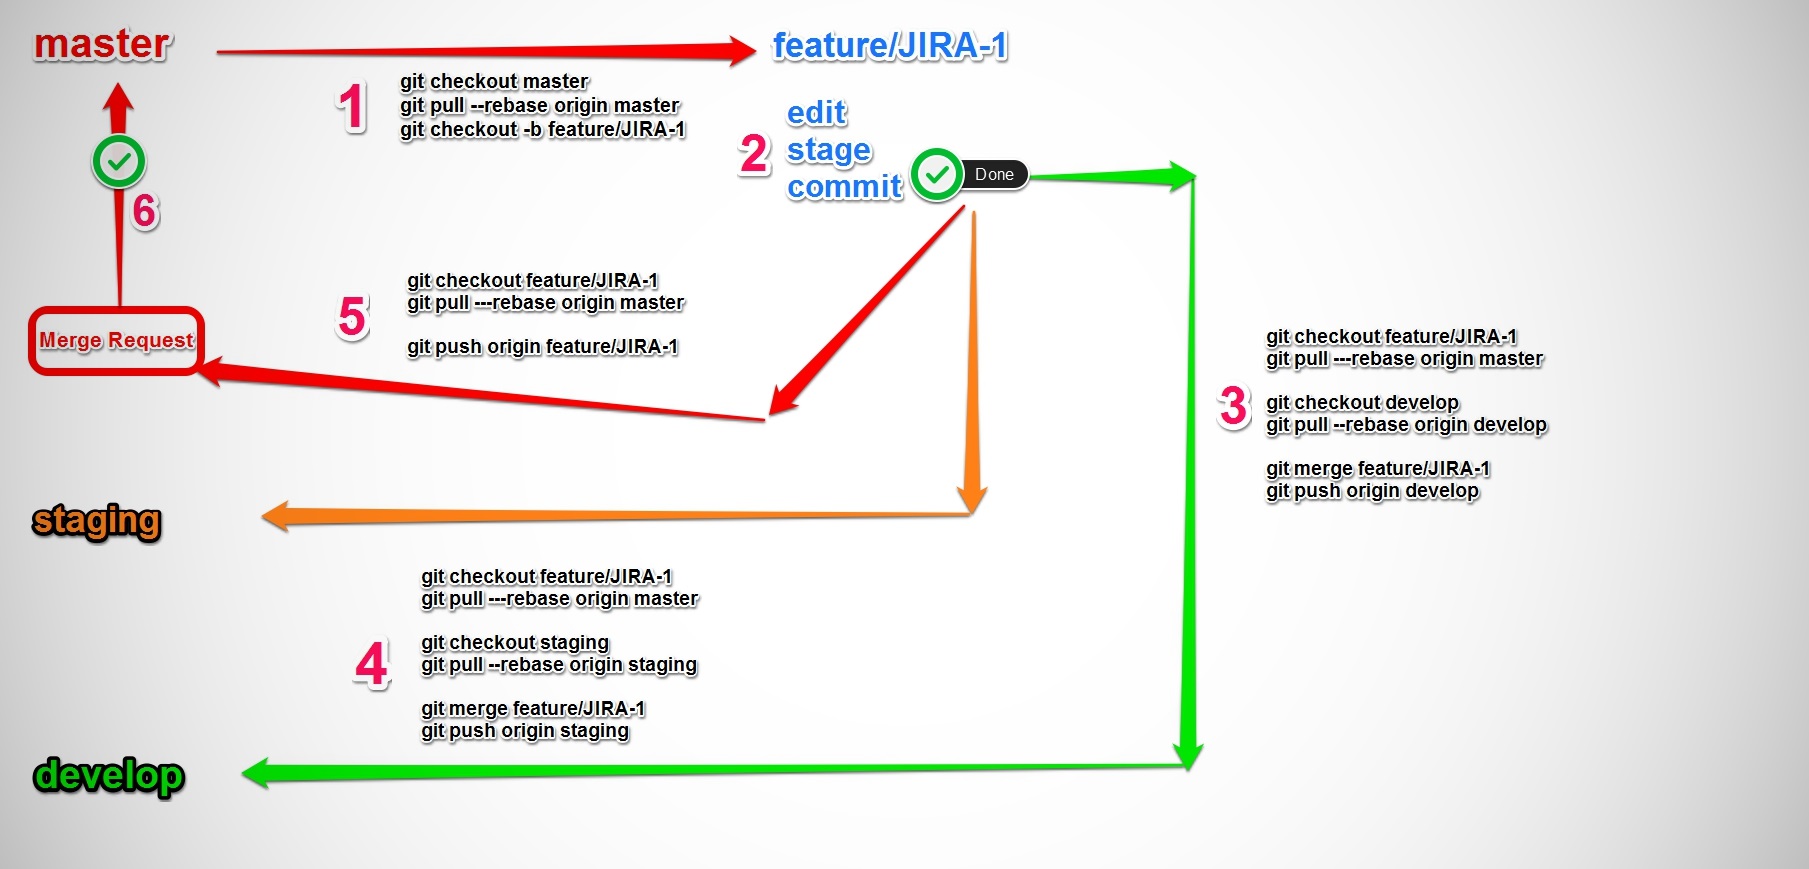
Branching and Merging Recipes
1.Create your branch
- Switch to master branch
- Pull all changes from origin/master
- Create a support branch (do not forget our naming convention “hotfix/JiraKey”)
# Step-1
git checkout master

# Step-2
git pull --rebase origin master

# Step-3
git checkout -b feature/JIRA-1
2.Staging Your Changes
You perform usual staging (git add) and commit (git commit) as you make your changes.
git add -A
git commit -m "JIRA-1: Implement this super new feature"
Do not forget our commit message practices. All commits should be prefixed with the jira issue key
3.Preparing for integration
Before integrating a feature/hotfix branch into environment branches we shall do some commit cleanup.
- Inspect your branch log and find the hash of your first commit
- Rebase your branch interactively starting from the parent of your first commit
- Squash your commits so that we have only one commit
# Step-1 : inspect your branch log
git log

# Step-2 : find your first commit hash
git rebase -i [Your first commit hash]^

# Step-3 : squash your commits into single commit
# Read on
Please note, in Step-2 we use ^ (caret) as the postfix of your first commit’s hash. This identifies the parent of our first commit which our rebase will start from (exluding the parent commit)
Interactive rebase will bring up your text editor (if you did not configure one this will be vi i guess) and you will see a text file which looks like this
pick 26c5dcc My first commit
pick d457ffb Another commit
pick 50ef9aa One more commit
Each line in this text file indicates a commit performed by you. In order to squash all commits to single one you leave the “pick” at the first commit and replace the “pick” on the following lines with “squash”. The resulting text should look like this
pick 26c5dcc My first commit
squash d457ffb Another commit
squash 50ef9aa One more commit
When you close the text editor, Git will show you the text editor once more with new content and give you the chance to edit the final commit message.
This is a good time to check if your commit follows our commit message practice.
You are done and ready to integrate your feature/hotfix with environment branches.
DO NOT squash your commits on a shared (published) branch.
4.Deploy changes to [develop]
# Make sure you are on your feature branch. If not checkout to your feature branch
git checkout feature/JIRA-1

# rebase your feature branch from origin/master and resolve any conflicts
git pull --rebase origin master
# switch to the develop branch
git checkout develop

# rebase local develop from origin/develop
# which could contain merged branches from other team members
git pull --rebase origin develop

# merge your branch
git merge feature/JIRA-1
# push changes to origin/develop (which might trigger a build)
git push origin develop
5.Deploy changes to [staging]
We are ready to deploy the changes to the staging environment branch for user acceptance testing.
# checkout your feature branch and rebase from origin master
git checkout feature/JIRA-1
git pull --rebase origin master
# checkout staging and rebase from origin staging
git checkout staging
git pull --rebase origin staging
# merge your branch
git merge feature/JIRA-1

# push changes to origin/develop (which might trigger a build)
git push origin staging
6. Fix User Acceptance Testing issues
Neither developers nor customers are perfect. Expect modifications to the feature or bug reports while the feature is still in staging. In this acceptance loop you will need to repeat the recipes 2 to 5 with a new #1 recipe which is like
# checkout your feature branch and rebase from master
git checkout feature/JIRA-1
git pull --rebase origin master
# checkout staging branch and rebase from origin staging
git checkout staging
git pull --rebase origin staging

# follow recipes 2 to 5
7. Deploy changes to production [master]
# checkout your feature branch and rebase from master
git checkout feature/JIRA-1
git pull --rebase origin master
# push your branch to origin
git push origin feature/JIRA-1

# Open a Merge Request on GitLab to merge feature branch into master
Merge and Conflict Resolution
Change your conflict style setting to diff3
Initial content is
1 public void TestMethod(string myValue)
2 {
3    ResourceManager.Initialize();
4 }
Contents of the local develop branch. Please note we have added some code in line 4
1 public void TestMethod(string myValue)
2 {
3    ResourceManager.Initialize(ResourceType.Database|ResourceType.Network|ResourceType.Storage);
4 }
Contents of the remote develeop branch. Please note someone has added code in line 3
1 public void TestMethod(string myValue)
2 {
3    DatabaseResourceManager.Initiailize(ResourceType.All)
4 }
When we perform git pull –rebase origin develop we will have a conflict and you will see something like this
public void TestMethod(string myValue)
{
<<<<<<< HEAD
    ResourceManager.Initialize(ResourceType.All);
=======
    ResourceManager.Initialize(ResourceType.Database|ResourceType.Network|ResourceType.Storage);
>>>>>>> Add resource types to be initialized
}
Now let’s change the conflict style to diff3 with the following git config command
git config --global merge.conflictstyle diff3
public void TestMethod(string myValue)
{
<<<<<<< HEAD
    ResourceManager.Initialize(ResourceType.All);
||||||| merged common ancestors
    ResourceManager.Initialize();
=======
    ResourceManager.Initialize(ResourceType.Database|ResourceType.Network|ResourceType.Storage);
>>>>>>> Add resource types to be initialized
}
You can read Reducing merge headaches: git meets diff3 for more details about diff3 conflict style
A funky git command : git rerere
The environment branching workflow requires at least three merges, one for each environment, for a single feature branch. This might be a tedious process especially when you hit too many conflicts during each merge. You will have to resolve the same conflict multiple times. Don’t fear Git has a funky command to ease this process, meet the git rerere command. rerere stands for “replay recorded resolutoin” and see what Git document says for this command
In a workflow employing relatively long lived topic branches, the developer sometimes needs to resolve the same conflicts over and over again until the topic branches are done (either merged to the “release” branch, or sent out and accepted upstream). This command assists the developer in this process by recording conflicted automerge results and corresponding hand resolve results on the initial manual merge, and applying previously recorded hand resolutions to their corresponding automerge results. Note: You need to set the configuration variable rerere.enabled in order to enable this command.
So in order to enable rerere we set the rerere.enabled to true using the following git config command
git config --global rerere.enabled true
With this setting in effect Git starts recording your resolutions and applies them as needed.
Setting up Araxis as merge tool
[mergetool "araxis"]
    cmd = \"C:/Program Files/Araxis/Araxis Merge/araxisgitmerge.exe\" "$PWD/$REMOTE" "$PWD/$BASE" "$PWD/$LOCAL" "$PWD/$MERGED"
    keepTemporaries = false
    trustExitCode = false
    keepBackup = false

[difftool "araxis"]
    cmd = \"C:/Program Files/Araxis/Araxis Merge/compare.exe\" "$PWD/$REMOTE" "$PWD/$BASE" "$PWD/$LOCAL" "$PWD/$MERGED"

[merge]
    keepBackup = false
    tool = araxis
	conflictstyle = diff3

[diff]
    tool=araxis
    renames = true
Setting up TortoiseMerge as diff/merge tool
[mergetool "tortoise"]
    cmd = TortoiseMerge.exe -base:\"$BASE\" -mine:\"$LOCAL\" -theirs:\"$REMOTE\" -merged:\"$MERGED\"

[difftool "tortoise"]
    cmd = tortoisemerge.exe -mine:\"$REMOTE\" -base:\"$LOCAL\"

[merge]
    keepBackup = false
    tool = tortoise
	conflictstyle = diff3

[diff]
    tool=tortoise
    renames = true
Getting rid of merge backup files
Git will create and keep some backup files when the configured merge tool is invoked. In order to disable this behavior you can set the mergetool.keepBackup config variable value to false with the following config command
git config --global mergetool.keepBackup false
This is only the Git side of the backup files story, your merge tool might keep it’s own backup files which may show up as untracked files in your git repository. Please consult your tool’s documentation to disable this behavior or configure a global .gitignore file and add those backup files to .gitignore
You can configure a global .gitignore file with the following command
# On Unix, Linux or Max OSX
git config --global core.excludesfile '~/.gitignore'

# On Windows
git config --global core.excludesfile "%USERPROFILE%\.gitignore"
LOCAL,REMOTE, BASE and MERGE?
After you complete the merge tool setup you will see (in Araxis) three panes named Remote,Base and Local. Let’s try to distill what each pane representes in terms of Git
- BASE is set to the name of a temporary file containing the common base for the merge, if available
- LOCAL is set to the name of a temporary file containing the contents of the file on the current branch
- REMOTE is set to the name of a temporary file containing the contents of the file to be merged
- MERGED is set to the name of the file to which the merge tool should write the result of the merge resolution
Source git-scm.com
NOTE : Do not be fooled by the fact that Araxis displays BASE as the name of the middle pane. The target of the merge operation is that BASE pane but Araxis writes the merged content into $MERGE. You are not modifying the common base
Rebase
For example if you rebase your local staging branch from origin staging each pane will display the following in case of a conflict
- BASE, shows the common base
- LOCAL, shows the contents of the origin staging
- REMOTE, shows the contents of staging.
Plain Merge
For example when you merge your feature branch to staging each pane will display the following in case of a conflict
- BASE, shows the common base
- LOCAL, shows the contents of the staging branch
- REMOTE, shows the contents of your feature branch.
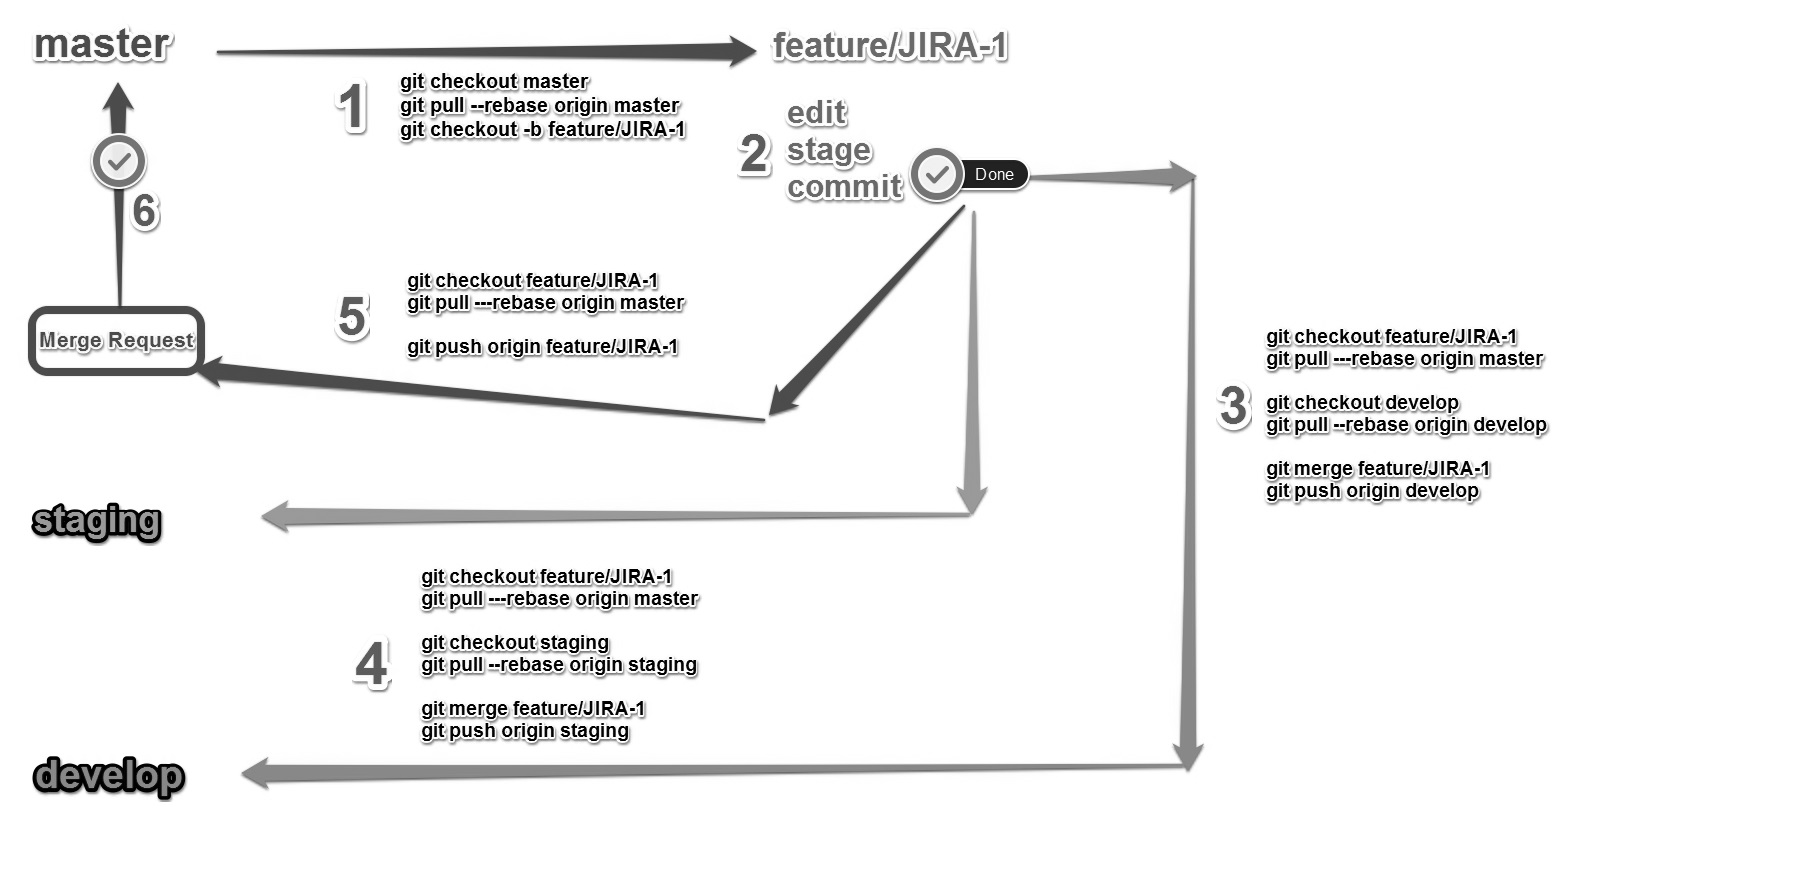
Cheatsheets
Full size images are here

If you liked this post, you can share it with your followers or follow me on Twitter!